Computer Wifi Continuously Turning on and Off
Windows 10 has been one of the most stable Windows operating systems to use after Windows 8 and 8.1 and with the advent of Windows 11 as the new iteration, the problems that Windows 10 carried were also carried over to Windows 11. One of the many problems the OS had was that of buggy WiFi and with reports around the internet and Reddit where the Windows 10 wifi keeps turning off automatically, Windows 11 also has similar issues.
Thankfully, they are easy to fix on both of these operating systems and even the steps to do so are similar.
- Why Does My Wi-Fi Keep Turning Off?
- Fix #1: Update Wireless & Network Adapter Drivers
- Manually Updating your Drivers on Windows 10 and Windows 11
- Fix #2: Disable WiFi Sense
- Fix #3: Disable Power Management for your WiFi Adapter
- Fix #4: Reset WLAN AutoConfig Service
- Fix #5: Remove Unused VPN or Proxies
- Fix #6: Hardware Issues, Contact for RMA
Why Does My Wi-Fi Keep Turning Off?
One of the many things, why Windows 10 WiFi keeps turning off is the fact that your drivers are outdated and not able to handle the hardware properly. There can obviously be other issues, let us get started with a list of things that might cause this on your set of hardware.
- Outdated drivers or incorrect drivers
- WiFi Sense interrupting with network settings
- Incorrect power management settings for wireless controllers – WiFi and Bluetooth
- Buggy AutoConfig Service for WiFi
- Remove VPNs or Proxies that you don't use
- Hardware issues
Fix #1: Update Wireless & Network Adapter Drivers
The driver update process is different depending on the kind of hardware you're running. If you have a pre-built PC or a laptop from a company such as Dell, HP or any other brand, your OS installation should come with a driver update utility. Use that to update the drivers and you will get it done in no time.
Manually Updating your Drivers on Windows 10 and Windows 11
If you do not have such utility available, you will need to visit the brand's service portal and follow the steps below. For this example, we will be working with the HP support website but the steps would be similar for all other brands.
- Visit the HP (or your brand's) support web portal and search for your laptop or PC using the model number
- Once you search it, you will see the list of available drivers for your machine's components.
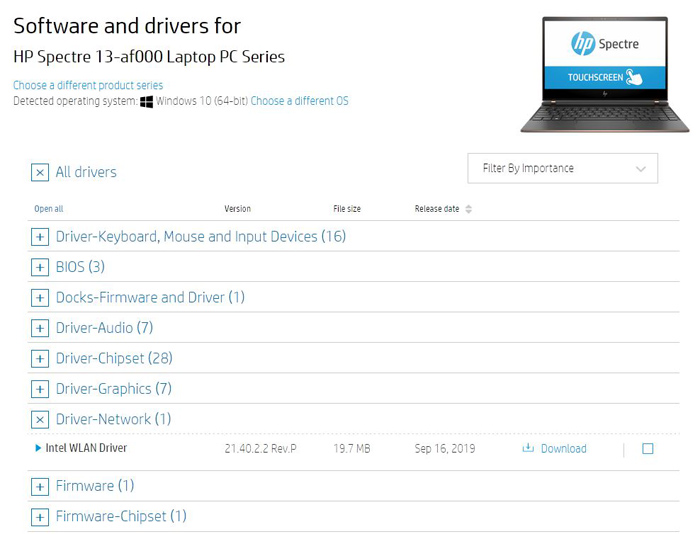
- Once you are able to access the list, check for the Network Drivers and download them.
- Once downloaded, go ahead and install them and follow the setup as instructed.
Keep in mind that the same process will work for any other brand you have – be it Dell, Razer, or something else. Just make sure to visit the correct support portal for your machine. Do not download the drivers from any other sources.
Fix #2: Disable WiFi Sense
WiFi Sense has introduced later in the line of Windows 10 updates in the 1803 version. It basically helps your computer remember and manage public WiFi networks or networks shared by your contacts. Sometimes it can interfere with the normal operations of WiFi on your machine and that might be the reason why the WiFi automatically turns off. It is better to disable it as the network will function normally without any hitches even when it is disabled.
Follow the steps below to disable WiFi Sense.
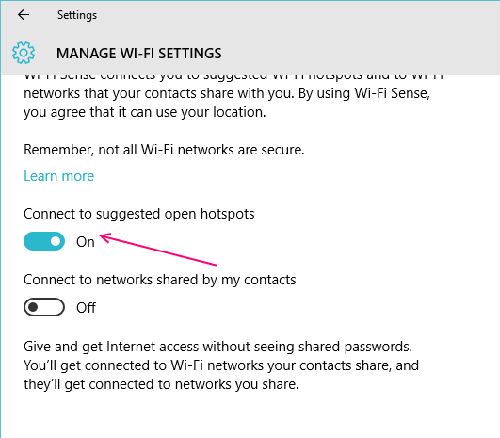
- Open the Settings app on your Windows machine and in the search bar, search for WiFi Sense.
- Open the result that comes up and you will find a screen that looks like the screenshot below.
- Disable both of the options available there on the screen and once you have done that, just reboot your PC.
Fix #3: Disable Power Management for your WiFi Adapter
When your computer's power management settings are misconfigured, you can see components stop working when your PC sleeps or wakes up from sleep. It is quite simple to correctly configure this and you just have to follow the steps below.
- Open the Control Panel on your Windows computer and head over to the Network and Sharing Center settings.
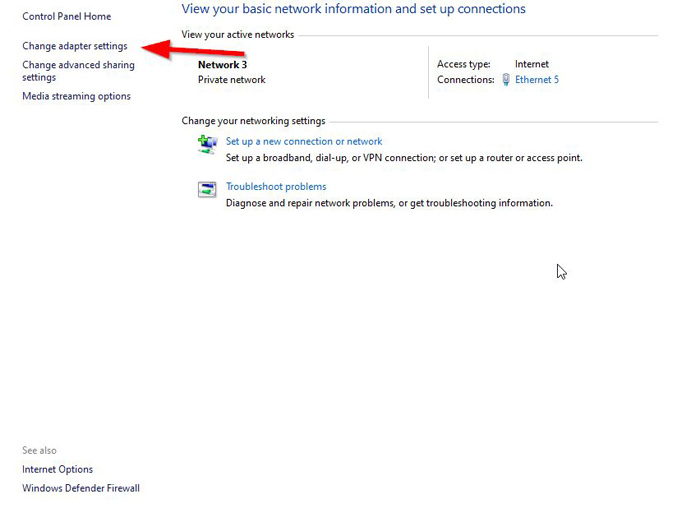
- Click on Change adapter settings and right-click on the adapter and open Properties.
- Once the window is open, it will look like the screenshot below.
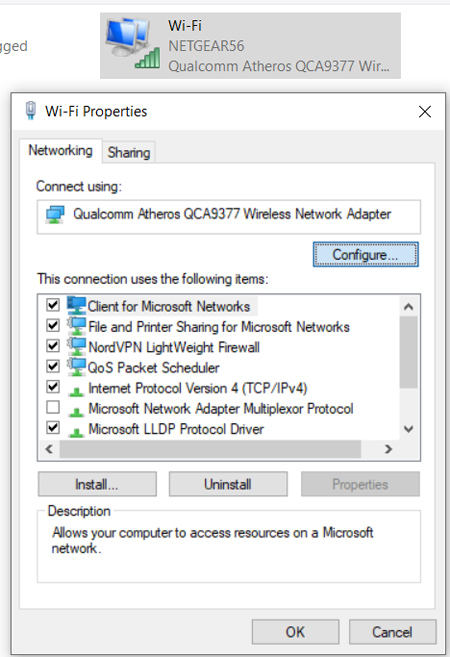
- Click on the Configure button and then switch over to the Power Management tab.
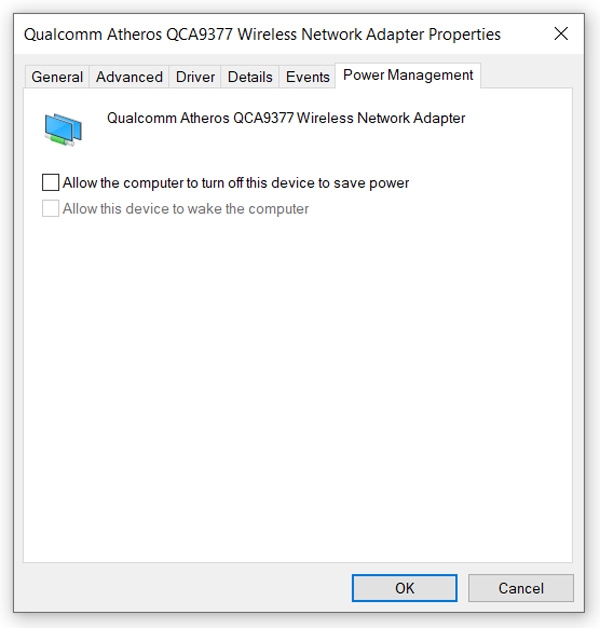
- Once in the Power Management tab, uncheck the Allow the computer to turn off this device to save power and then click on the OK button.
Once these steps are completed, just reboot your PC and you're all good to go.
Fix #4: Reset WLAN AutoConfig Service
Windows 10 and Windows 11 both have countless services that handle a bunch of things and jobs. One of these services is the WLAN AutoConfig service. These services can be misconfigured by a program or bad driver that you may have. They can be reset to their default operation though and doing that requires following the steps below.
- On your keyboard press the Windows Key + R button simultaneously and this will open the Run dialogue.
- Once the dialogue is open, type in services.msc and this will open the Windows Services window.
- Once open, scroll down and find the WLAN AutoConfig option and right click on it and click on Properties. This will open a new window that looks like the screenshot below.
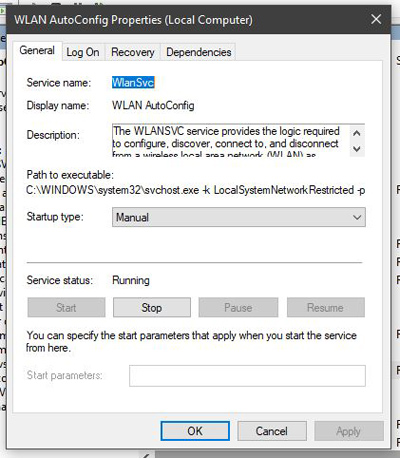
- Once the Properties window is open, click on the dropdown menu for Startup type and choose Automatic.
Once you have chosen the Automatic option, click on Apply and then OK. Reboot your computer and the service will perform normally. This will fix the WLAN AutoConfig issue and your WiFi will work normally.
Fix #5: Remove Unused VPN or Proxies
VPNs and Proxy Networks work on your computer by creating virtual adapters. These virtual network adapters can often create unwanted issues that will interfere will your physical wireless adapters and stop them from working correctly.
It's always best to clear up any of these virtual adapters to prevent the issue from popping up. The steps to remove the adapters are given below.
- Open the Control Panel and open the Network and Sharing Center.
- Click on Change adapter settings and that will show you all the network adapters available on your machine.
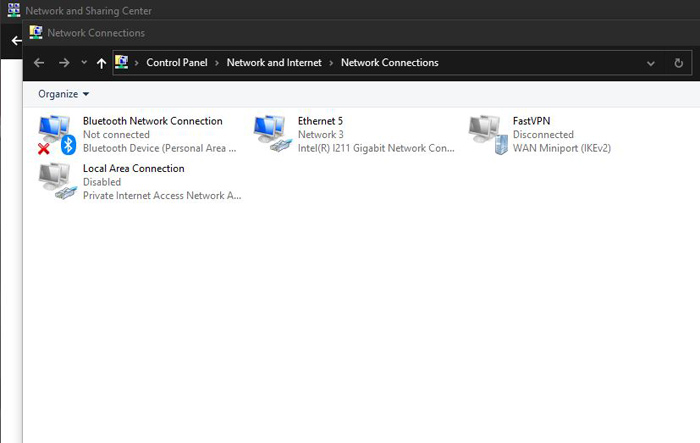
- As you can see in the image above, there are two virtual adapters for two different VPNs.
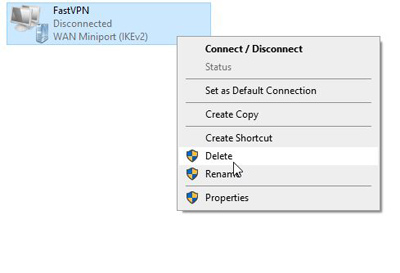
- Just right-click on the one that you do not want and click on the Delete option and that adapter will be completely removed from the PC.
Fix #6: Hardware Issues, Contact for RMA
Sometimes to find the cause that windows 10 wifi keeps turning off, the issue isn't related to software at all and cannot be fixed with the steps we have mentioned above. In those cases, it is always a better option to get the issue troubleshot by your brand's support.
Brands have a team of technicians who can connect remotely to your machine and diagnose the issue for you. Once the issue is confirmed, they can start an RMA process for your machine which will fix the issue on the hardware level.
For people who have hardware issues with the WiFi adapter and their machine is out of warranty, they can use an external USB adapter like this one and it will work flawlessly.
Disclosure: Content published on TechRT is reader-supported. We may receive a commission for purchases made through our affiliate links at no extra cost to you. Read our Disclaimer page to know more about our funding, editorial policies, and ways to support us.
Source: https://techrt.com/windows-10-wifi-keeps-turning-off/
0 Response to "Computer Wifi Continuously Turning on and Off"
Post a Comment